

From Bill a Happy Rainier Satellite Customer in Florida.
“This is a review about Rainier Satellites product, the Mighty Mini big dish mover. I ordered the MMBDT-EX model . It replaces their Pansat AP-600 I was using. The AP-600 has served me well, and still works fine. Though being the kind of guy that likes to be on the cutting edge of technology I needed to check out Rainier’s latest achievement.
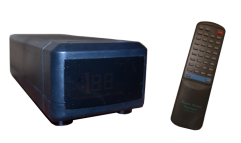
Unboxing the Mighty Mini I was surprised at size of the unit. Anyone who used trackers back in the day were always greeted with a large boxy unit, this is not the case here. The Mighty Mini is slender but long. Its height is approximately a half inch taller than Rainier’s D9865 receiver. Don’t let the small size fool you this thing has some serious guts. Sitting next to the D9865 it takes up less space than the 4DTV or an analog IRD’s did. This is great since it easily fits in rack space you had allocated for a IRD such as the 4DTV. You don’t need to spend hours figuring out where you’re going to install it. I can see Rainier did their homework with the units sizing making it a great match for your entertainment center and to work nicely alongside their D9865 receiver.
Hooking up the unit is simple. As with most mover installs you have four wires. Two heavy wires for the motor itself and two for the sensor. I use Rainiers 36 inch Venture actuator with my 10 foot Winegard dish. Venture uses the most common reed sensor. So four wires are only needed.
The paperwork states the unit can work with all three type of sensors. Reed, hall effect and optical. There’s a 5 volt terminal for 5 wire optical setup, something you don’t see usually. It’s great Rainier made this option available without additional accessories required.
The terminals on the rear are spring clip type for easy connection. I would recommend stripping your wires down to get some clean strands then twist them well before inserting them. If you want to go that extra mile and know how to solder, tinning the leads will keep the strands together. This is what I do. Make sure your connections are firmly seated inside the spring clips. The top center and right are for motor 1 and 2. The bottom center and right are for your reed sensor. The other two terminals top right supplies 5 volts for optical sensors. Bottom right is ground for your shield or drain wire if needed. From my experience, this may or may not be required. Sometimes counting accuracy is better with it connected or disconnected. Your mileage may vary. My past installs of movers always works better without the drain wire connected. This too was the case with the Mighty Mini. Some claim to connect the drain wire at the actuator itself. I never needed to. Your install could be different. Do whatever works best for you. At this point I stress double checking your connections to make sure you have no stray strands shorting or touching what they shouldn’t. If when you try to move your the dish first time the dish goes the wrong way all you need to do is reverse M1 and M2.
The next step I did was to go out to the dish and remove the cover at the actuator itself. I recommended to clean up the connections there if it’s been a while. Clip the wires strip and twist the strands then reconnect them. This can go a long way with avoiding electrical problems because of dirty connections. Make sure nothing is shorting or any stray strands are showing.
The following step is very important so don’t ignore it. You will need to set your mechanical limit switches at your actuator if not done already. Rainier includes instructions for the Venture actuator with the Mighty Mini. You can use this as a guide or contact your arm manufacturer for specific instructions. The reason this step is so important is because you don’t want your dish driven into a wall, ground etc. It’s better to be safe than sorry.
To set the mechanical limits go to the mighty mini plug it in and power it up. Using the arrow keys on the bottom of the remote press them to see if the dish moves, and in the right direction with the corresponding arrows. East (right) West (left) is what I used. If it works backwards reverse M1 and M2 on the Mighty Mini. If you get a E2 error or something else you have something connected wrong. Recheck all connections and try again. At this point the dish should be moving. Move the dish to where you want your east and west travel to stop, then set the cam inside the actuator motor to disconnect the electric. Once your satisfied button up the cover and make sure its weather tight.
It was now time to come inside and begin programming the mover. Move your dish to the west till it stops. Now perform a reset of the unit. This is performed by pushing the reset button on the remote and holding. A countdown will commence. 10.. 9.. 8.. etc …. 2 .. 1 then two dashes will show. This shows the reset was successful. This flushes the internal counter and wipes any old or corrupt data Rainier’s tech support told me. Power off the Mighty Mini with the remote then on again, a small zero will show on the display. The first satellite I wanted in there was 133 west. I entered into my D9865 to the parameters for EWTN as shown on lyngsat. Then slowly moved the dish to the east till I got a lock. I then bumped the dish east and west for maximum signal quality.
It was now time to store Galaxy 15, 133 west in the mover. To do this you press and hold store for 2 seconds the display on the unit rotates to the right, press a key 1 to 32 to store. I picked 1 for 133 west. The 1 flashed then went steady. This told me It was successfully stored. I then proceeded to the east using the same method for all the satellites I needed. 131 was 2, 127 was 3, 125 was 4 and so on. Once I got to 87 west I was done programming since I don’t need anything east of that. If you want to you can continue till all 32 direct presets are full.
Now came the fun part seeing how accurate it is. I told the Mighty Mini to go to preset 3, 125 west. This was done simply by pressing the number 3 key on the remote. The unit clicked and the dish started moving to the west as indicated by the 4 lines moving to the right on the display. I confirmed by eyeballing the dish itself. The unit stopped and the number 3 appeared. I told the D9865 to acquire my preset for Newsmax. It was a success and checked my quality. The number was high and steady so she accurately returned to what I stored Newsmax started playing. Before becoming too involved in the whats going on I decided to check to see that all my programmed satellites were targeted well. I was happy to see they were. I stepped through them one at a time pulling up the Rainier channels checking quality.
That told me the Mighty Mini is accurate. If I ever need to touch a satellite position up (which can happen from time to time I seen over the years) all I need to do is bump the dish position to peak the quality number and resave that preset.
One nice feature of the Mighty Mini is if for some reason you need to stop the dish in mid travel just hit any preset key. This will abort movement. To continue just hit the desired key you want.
All in all I’m very satisfied with the Mighty Mini ED. Rainier has a winner here. Something to be said for doing things right. I commend Rainier for all the hours of hours of hard work they put in in selling another winner.
The Mighty Mini ED works with FTA receivers too so if you own one of those it will work just fine for you.”
You can purchase the Mighty Mini ED by clicking the button below.